Integrate charging point metrics in Homeassistant with modbus
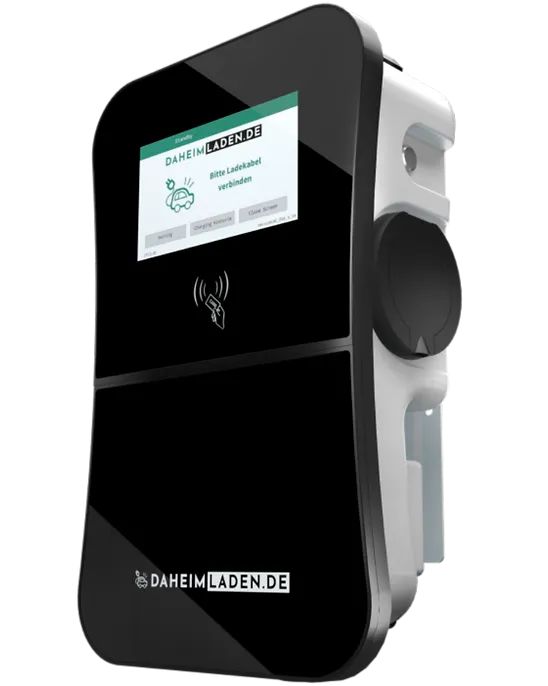
Since I have an EEV for driving, I own a charger at home. My device is from the manufacturer Daheimladen, a German company, and I think it is very cheap and straightforward. Here is an image of the "wallbox" Modell that I use:
The problem
The problem in my case is, that I cannot figure out when my car has completed his charging. Yes I can use the app from my car instead. But I think that I can switch my care more often as the wallbox, so my wallbox will be more resident at my home.
I figured out the specs of the wallbox, and thanks to the cool support of the manufacturer, I figured out how I can get the required data out of it. But unfortunately there is no specific API for that, you must use the modbus protocol.
What is modbus?
Modbus operates on a master-slave architecture, where a master device (such as a PLC or computer) controls communication with multiple slave devices (e.g., sensors or actuators). The master requests a specific slave, which then processes and returns the response. This communication happens over a serial or Ethernet network, and only one device can communicate at a time, ensuring no data collisions. Modbus is often used in industrial automation due to its simplicity and reliability for controlling and monitoring devices.
Modbus is used in various industries, including manufacturing, energy, water treatment, and building automation, to control and monitor devices like motor drives, meters, valve controllers, and other field devices. In my case, the charger also.
I also figured out that many devices that have an ethernet port will use the Modbus protocol. So my heater at home will also use it, and maybe I will connect it too.
The first step in Modbus
My first steps are in the Linux command shell, so it will be possible to create requests to read out the registers. For that, we need some information about the data frame format. Luckily, there exists some information about that.
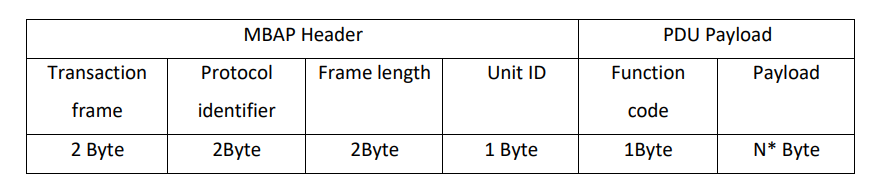
So you will see that the message will be constructed with a header and its payload. Let me introduce the Header. This is very simple. Please keep in mind that we must set that all as Hexadecimal values
- Transaction
This will be set every time to a number of your choice because this will identify YOUR transaction number, in our case 0x0001 - Protocol
This will everytime set to 0x0000 this is specific to modbus. - Frame Length
The length is set to the length of bytes. I will send a 6 Bytes command it is set to 6. Please be careful to use the 2 Bytes notation, so it will be set to 0x0006 - Unit ID
This ID will be declared by the manufacturer. So in my case, it's "0xff"
Now, the values for the Payload
- Function code
This code will indicate what action the device must execute, this is standardized. I will request a read of the registers. So I set it to "0x03". - Payload
Now the Payload this will tell the device to start to read from register 100 and read the next 2 register.
I will use Netcat to send the data. So my command will look like that
echo -ne '\x00\x01\x00\x00\x00\x06\xff\x03\x00\x64\x00\x02' | nc 192.168.178.123 502Here you will see the result:
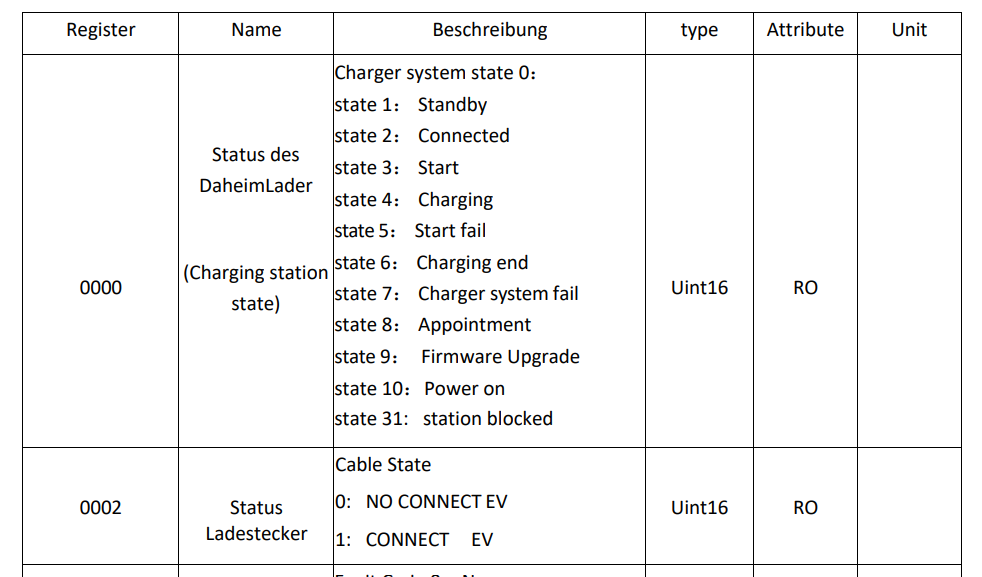
It works, so the device sends me something back. I will see the values from that in the register. The next step is to get information about the available registers for the information that I need. I connected with the manufacturer, and he handed me over the registration specifications.
It is a huge list of registers and their meanings, and it looks like this
So, in this case, I know that the connection works, and the data will be returned.
The example above introduced how communication works. Plenty of tools will gather the registers and their contents, too. So I use one of them: "mobustester." That will get the information out of the device, and I can check it against the lists, too.
This looks for example, like this:
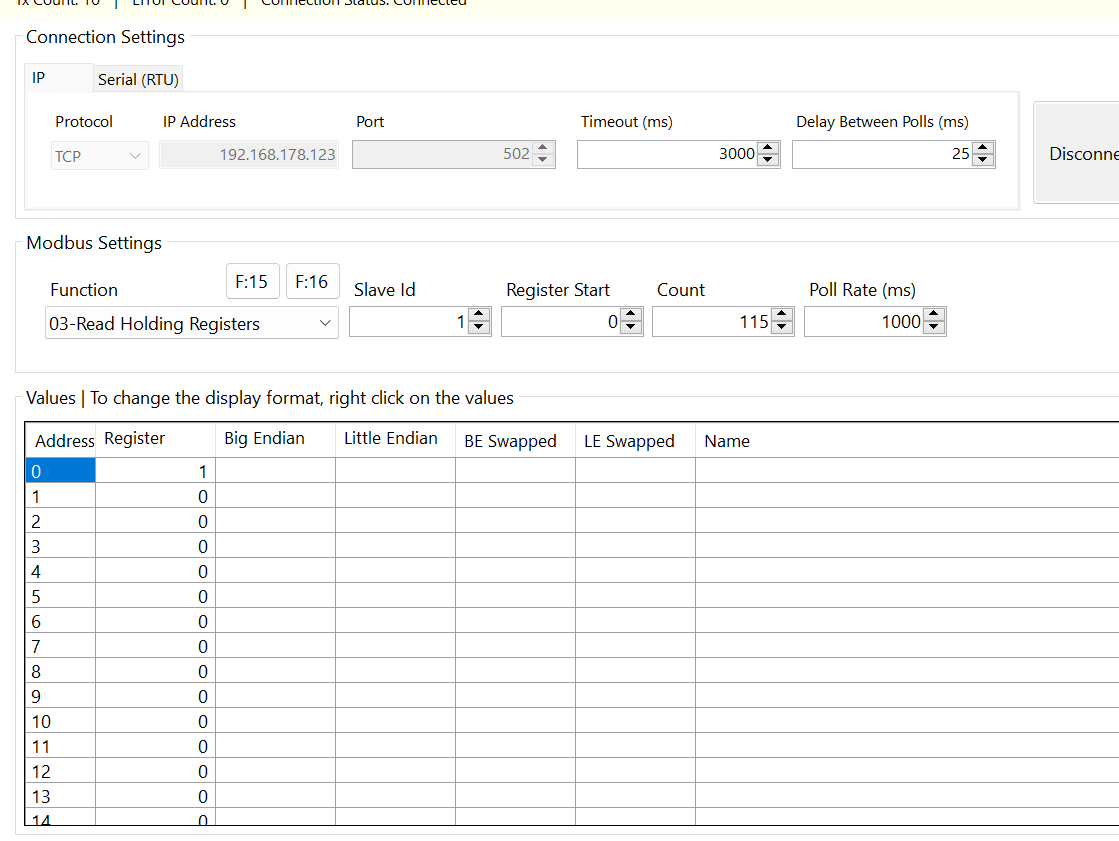
So the next step is more work effort.
Using Modbus in Homeassistant
So Homeassistant has a ready-to-use Modbus extension for that. I saw several implementations that use node-red, and now I know why. Its documentation is... yeah... very limited and hard to understand at first. But it is possible to get the data with that extension.
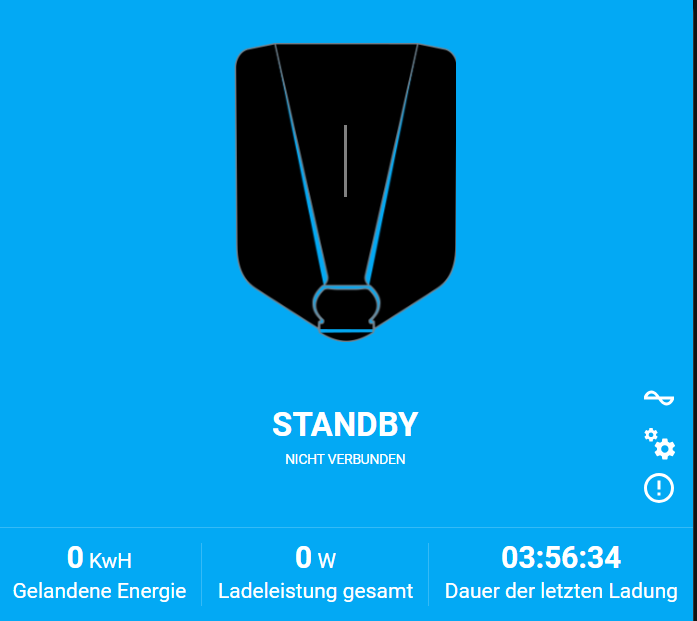
So, to get the final result like
I must get the information out of the Modbus registers. The first step is to configure the Modbus connection. I use this configuration
modbus:
  - name: DaheimLaden
    type: tcp
    host: 192.168.178.123
    port: 502
    delay: 25
    message_wait_milliseconds: 30
    timeout: 5
I use the Modbus extension. In that, I set the internal name to DaheimLaden and the connection type to TCP because I want to access the data via Ethernet / Wi-Fi. Since TCP is set as the type, you must enter the host IP and, optionally, the port. So, in my case, I set it to the IP for the charger and the Port to 502. That's the default port.
The delay is significant because when you request the data too often, it can get very unstable in fetching the right data. The message_wait_milliseconds parameter tells how long it will be waiting for a message. Also the timeout is mandatory, it tells the timeout of the complete process.
Important, every change to modbus will require a restart of the complete homeassistant instance.
Now that the common configuration is set, we must fetch the registers. Let's explain this with the state of the charger.
    timeout: 5
    sensors:
      - name: DaheimLaden_State
        data_type: int16
        input_type: holding
        address: 0000
The timeout is copied as reference to the YAML above. So you have now the node sensors. Below that, you will define the name, datatype and the address of the value. The name will be used later in Homeassistant itself. Important is the input_type, set it to holding. Because otherwise you will get the values only one time not more.
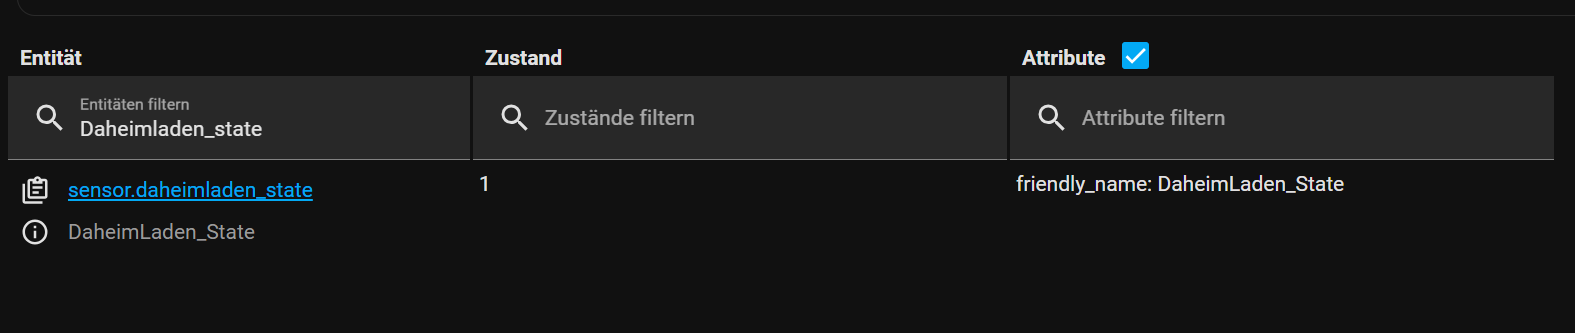
Now restart Homeassistant and you will see the new sensor and the fetched value:
You are able to add more sensors for each register. So finally, my configuration looks like this
    host: 192.168.178.123
    port: 502
    delay: 25
    message_wait_milliseconds: 30
    timeout: 5
    sensors:
      - name: DaheimLaden_State
        data_type: int16
        input_type: holding
        address: 0000
      - name: DaheimLaden_CableState
        data_type: int16
        input_type: holding
        address: 2
      - name: DaheimLaden_Charge_FaultCode
        data_type: int16
        input_type: holding
        address: 4
      - name: DaheimLaden_L1_Current
        data_type: int16
        input_type: holding
        address: 6
      - name: DaheimLaden_L2_Current
        data_type: int16
        input_type: holding
        address: 8
      - name: DaheimLaden_L3_Current
        data_type: int16
        input_type: holding
        address: 10
      - name: DaheimLaden_Charge_ActivePowerTotal
        data_type: int32
        input_type: holding
        address: 12
      - name: DaheimLaden_EnergyMeter
        data_type: int16
        input_type: holding
        address: 28
      - name: DaheimLaden_EVSE_maxCurrent
        data_type: int16
        input_type: Holding
        address: 34
      - name: DaheimLaden_Cable_maxCurrent
        data_type: int16
        input_type: holding
        address: 36
      - name: DaheimLaden_UserID
        data_type: int16
        input_type: holding
        address: 38
      - name: DaheimLaden_CardID
        data_type: int16
        input_type: holding
        address: 54
      - name: DaheimLaden_Charge_energy
        data_type: int16
        input_type: holding
        address: 72
      - name: DaheimLaden_StartTime_hh
        data_type: int16
        input_type: holding
        address: 74
      - name: DaheimLaden_StartTime_mm
        data_type: int16
        input_type: holding
        address: 75
      - name: DaheimLaden_StartTime_ss
        data_type: int16
        input_type: holding
        address: 76
      - name: DaheimLaden_RawData
        data_type: int16
        input_type: holding
        address: 78
      - name: DaheimLaden_Charging_time
        data_type: int16
        input_type: holding
        address: 79
      - name: DaheimLaden_EndTime_HH
        data_type: int16
       input_type: holding
        address: 82
      - name: DaheimLaden_EndTime_MM
        data_type: int16
        input_type: holding
        address: 83
      - name: DaheimLaden_EndTime_SS
        data_type: int16
        input_type: holding
        address: 84
      - name: DaheimLaden_Max_LoadinPower
        data_type: int16
        input_type: holding
        address: 87
      - name: DaheimLaden_ConTimeOut
        data_type: int16
        input_type: holding
        address: 89
      - name: DaheimLaden_L1_Voltage
        data_type: int16
        input_type: holding
        address: 109
      - name: DaheimLaden_L2_Voltage
        data_type: int16
        input_type: holding
        address: 111
      - name: DaheimLaden_L3_Voltage
        data_type: int16
        input_type: holding
        address: 113
With this, I am able to fetch every value I need. Yes, the names are not very nice, but it works, and I can use it right. Please be careful when using the right data_type. Otherwise, you will get the wrong data.
Creating a custom Sensor
Above, you saw a nice informative card. This is a predefined card instance that I reused. But first, I created a custom template sensor because I wanted one sensor that would keep all data as an attribute.
Especially the states and decimal numbers. These must be formatted or translated into human-readable values.
Here is my full template yaml definition (German one ;) ).
sensors:
wallbox:
friendly_name: DaheimLaden
unique_id: DaheimLaden
value_template: >-
{{ states("sensor.DaheimLaden_State") }}
attribute_templates:
StateText: >
{% set status = states("sensor.DaheimLaden_State") %}
{% if status == '1' %}
Standby
{% endif%}
{% if status == '2' %}
Verbunden
{% endif%}
{% if status == '3' %}
Start
{% endif%}
{% if status == '4' %}
Lade
{% endif%}
{% if status == '5' %}
Fehler starten
{% endif%}
{% if status == '6' %}
Laden abgeschlossen
{% endif%}
{% if status == '7' %}
Ladesystem Fehler
{% endif%}
{% if status == '8' %}
Termin
{% endif%}
{% if status == '9' %}
Firmware upgrade
{% endif%}
{% if status == '10' %}
Power On
{% endif%}
Charge_energy: >
{{(states("sensor.daheimladen_charge_energy") | float)*0.1 | round(2)}}
Charge_FaultCode: >
{{states("sensor.DaheimLaden_Charge_FaultCode") }}
Charge_ActivePowerTotal: >
{{states("sensor.DaheimLaden_Charge_ActivePowerTotal") }}
L1_Voltage: >
{{(states("sensor.DaheimLaden_L1_Voltage") |float |round(2)) *0.1 | round(2) }}
L2_Voltage: >
{{(states("sensor.DaheimLaden_L2_Voltage") |float) *0.1 | round(2) }}
L3_Voltage: >
{{(states("sensor.DaheimLaden_L3_Voltage") |float) *0.1 | round(2)}}
L1_Current: >
{{(states("sensor.DaheimLaden_L1_Current") |float) *0.1 | round(2)}}
L2_Current: >
{{(states("sensor.DaheimLaden_L2_Current") |float) *0.1 | round(2)}}
L3_Current: >
{{(states("sensor.DaheimLaden_L3_Current") |float) *0.1 | round(2)}}
CableMaxCurrent: >
{{(states("sensor.DaheimLaden_Cable_maxCurrent") |float) *0.1 | round(2)}}
EVSEMaxCurrent: >
{{(states("sensor.DaheimLaden_EVSE_maxCurrent") |float) *0.1 | round(2)}}
EVSEMinCurrent: >
{{(states("sensor.DaheimLaden_EVSE_minCurrent") |float) *0.1 | round(2)}}
Max_LoadingPower: >
{{states("sensor.DaheimLaden_Max_LoadinPower") }}
State: >
{{states("sensor.DaheimLaden_State") }}
EnergyMeter: >
{{states("sensor.DaheimLaden_EnergyMeter") }}
CableState: >
{{states("sensor.DaheimLaden_CableState") }}
CableStateText: >
{% set status = states("sensor.DaheimLaden_CableState") %}
{% if status == '1' %}
Verbunden
{% endif %}
{% if status == '0' %}
Nicht Verbunden
{% endif %}
Charging_time: >
{{ states("sensor.DaheimLaden_Charging_time")}}
StartTime: >
{% set hours = states("sensor.DaheimLaden_StartTime_hh") %}
{% set minutes = states("sensor.DaheimLaden_StartTime_mm") %}
{% set seconds = states("sensor.DaheimLaden_StartTime_ss") %}
{{ '%02d' % hours }}:{{ '%02d' % minutes }}:{{ '%02d' % seconds }}
UserId: >
{{ states("sensor.DaheimLaden_UserID") }}
CardId: >
{{ states("sensor.DaheimLaden_CardID") }}
EndTime: >
{% set hours = states("sensor.DaheimLaden_EndTime_HH") %}
{% set minutes = states("sensor.DaheimLaden_EndTime_MM") %}
{% set seconds = states("sensor.DaheimLaden_EndTime_SS") %}
{{ '%02d' % hours }}:{{ '%02d' % minutes }}:{{ '%02d' % seconds }}
ChargeEnergy: >
{{(states("sensor.DaheimLaden_Charge_energy") |float) *0.1 | round(2)}}
ConnectionTimeout: >
{% set total_seconds = states("sensor.DaheimLaden_ConTimeOut") %}
{% set hours = (total_seconds|int // 3600) %}
{% set minutes = (total_seconds|int % 3600) // 60 %}
{% set seconds = (total_seconds |int% 60) %}
{{ '%02d' % hours }}:{{ '%02d' % minutes }}:{{ '%02d' % seconds }}
ChargingTimeFormated: >
{% set total_seconds = states("sensor.DaheimLaden_Charging_time") %}
{% set hours = (total_seconds|int // 3600) %}
{% set minutes = (total_seconds|int % 3600) // 60 %}
{% set seconds = (total_seconds |int% 60) %}
{{ '%02d' % hours }}:{{ '%02d' % minutes }}:{{ '%02d' % seconds }}
FaultCode: >
{{ states("sensor.DaheimLaden_Charge_FaultCode") }}
FaultCodeText: >
{% set status = states("sensor.DaheimLaden_Charge_FaultCode") %}
{% if status == '0' %}
Kein Fehler
{% endif %}
{% if status == '11' %}
Spannungsfehler (CP-Control)
{% endif %}
{% if status == '12' %}
Notaus gedrückt gedrückt (EStop)
{% endif %}
{% if status == '13' %}
Unterspannung (Under Voltage)
{% endif %}
{% if status == '14' %}
Überspannung (Over Voltage)
{% endif %}
{% if status == '15' %}
Überhitzungsschutz aktiv (Over temperature)
{% endif %}
{% if status == '17' %}
Fehlerschutzschalter aktiv (Leakage Fault)
{% endif %}
{% if status == '16' %}
Stromzähler Fehler (Meter Fault)
{% endif %}
{% if status == '18' %}
Kurzschluss (Output short)
{% endif %}
{% if status == '19' %}
max. Ladeleistung Überschritten (Over Current)
{% endif %}
{% if status == '21' %}
Kommunikationsfehler mit inaktivem Farhzeug (Vehicle communication)
{% endif %}
{% if status == '22' %}
Identifikation der Ladeparameter des Fahrzeugs fehlgeschlagen (Vehicle unrecongizable)
{% endif %}
{% if status == '23' %}
Fehlerschutzschalter aktiv (Relay Adhesion)
{% endif %}
{% if status == '24' %}
Messsystem kalibrierung Fehlgeschlagen (Leakage Check Device)
{% endif %}
{% if status == '25' %}
Erdungsfehler (PE Fault)
{% endif %}
{% if status == '26' %}
Ladevorgang konnte nicht gestartet werden (Startup charging fault)
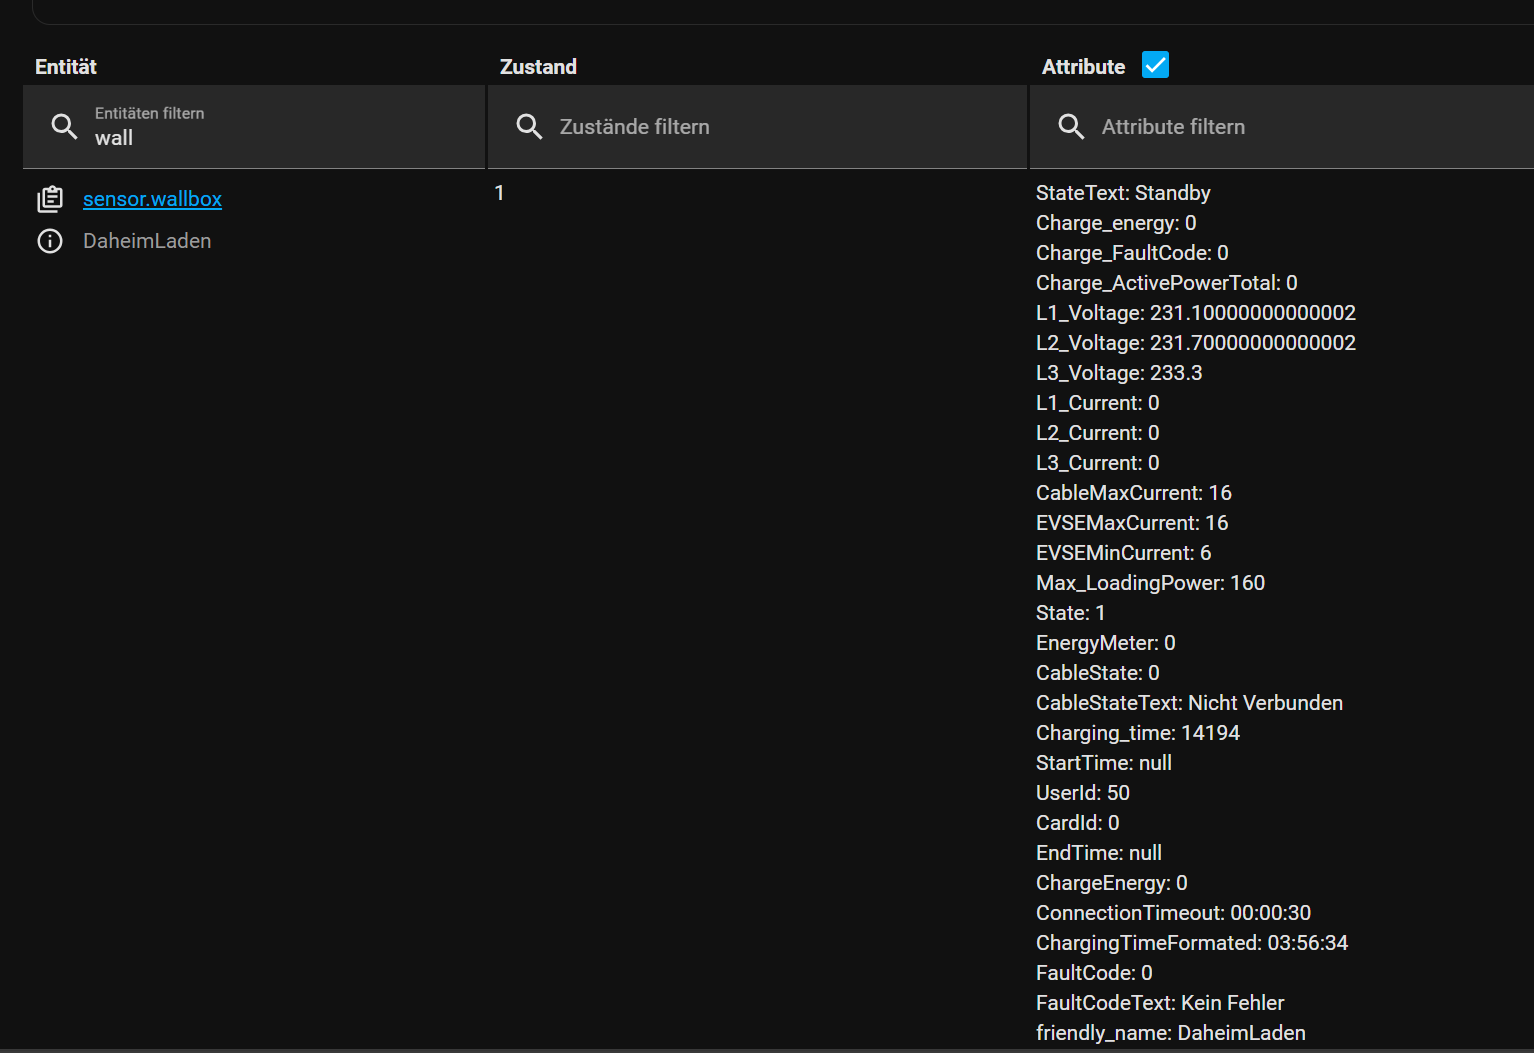
{% endif %}This will create a custom sensor called wallbox with all required attributes. If you applied that correctly, the sensor entity will be appear (also with the configured attributes)
Apply the data to the card
As I mentioned, I use an existing UI extension called charger-card. You can install it with HACS.
When you apply the values, you cannot use it out of the box. You must configure every information on your own. But thy to me... I can share my config for that.
type: custom:charger-card
entity: sensor.wallbox
details:
  status:
    entity_id: sensor.wallbox
    attribute: StateText
  substatus:
    entity_id: sensor.wallbox
    attribute: CableStateText
  collapsiblebuttons:
    group1:
      text: Leistungs Information
      icon: mdi:current-ac
    group2:
      text: Allgemeine Information
      icon: mdi:cogs
    group3:
      text: Fehlercodes
      icon: mdi:alert-circle-outline
  stats:
    default:
      - entity_id: sensor.wallbox
        attribute: Charge_energy
        text: Gelandene Energie
        unit_show: true
        unit: KwH
      - entity_id: sensor.wallbox
        attribute: Charge_ActivePowerTotal
        text: Ladeleistung gesamt
        unit_show: true
        unit: W
      - entity_id: sensor.wallbox
        attribute: ChargingTimeFormated
        text: Dauer der letzten Ladung
  group1:
    - entity_id: sensor.wallbox
      attribute: L1_Voltage
      icon: mdi:sine-wave
      unit_show: true
      unit: V
    - entity_id: sensor.wallbox
      attribute: L2_Voltage
      icon: mdi:sine-wave
      unit_show: true
      unit: V
    - entity_id: sensor.wallbox
      attribute: L3_Voltage
      icon: mdi:sine-wave
      unit_show: true
      unit: V
    - entity_id: sensor.wallbox
      attribute: L1_Current
      icon: mdi:flash
      unit_show: true
      unit: A
    - entity_id: sensor.wallbox
      attribute: L2_Current
      icon: mdi:flash
      unit_show: true
      unit: A
    - entity_id: sensor.wallbox
      attribute: L2_Current
      icon: mdi:flash
      unit_show: true
      unit: A
  group2:
    - entity_id: sensor.wallbox
      text: Maximaler Ladestrom des Kabels
      attribute: CableMaxCurrent
      icon: null
      unit: A
      unit_show: true
    - entity_id: sensor.wallbox
      text: Maximaler Ladestrom
      attribute: EVSEMaxCurrent
      icon: null
      unit: A
      unit_show: true
    - entity_id: sensor.wallbox
      text: Minimaler Ladestrom
      attribute: EVSEMinCurrent
      icon: null
      unit: A
      unit_show: true
  group3:
    - entity_id: sensor.wallbox
      text: FaultCodeText
      attribute: FaultCodeText
      icon: mdi:alert
Now you can apply this and the Information will show immediately.
Final words
I love Homeassistant. I worked several years ago with io broker. It was very powerful, but Homeassistant has the same features, and you have a nice-looking UI, too. Also, you can use special topics to implement very quickly.
After I figured out that my wallbox supports the Modbus protocol, I could use it in my Homeassistant instance with a little bit of trial and error. I hope that you can take a little bit benefit from this post. Leave me a comment with feedback.